Other

Internet Webed: Other

Internet Webed: Other

Showing posts with label Other. Show all posts

Build Smart Arduino LCD Battery Monitor with Custom Icon Using Arduino

Are you tired of your battery-powered projects dying unexpectedly? Do simple LED indicators leave you wondering if your battery is almost dead or just kinda low? If so, this project is for you! We'll build an intelligent battery monitor using an Arduino and a 20x4 LCD, complete with precise voltage and percentage readings, a custom graphical battery symbol, and a crucial blinking alert for low battery conditions.


Why This Project?

Traditional battery indicators often rely on just a few LEDs, giving you a very rough estimate of remaining power. This Arduino-based solution offers:

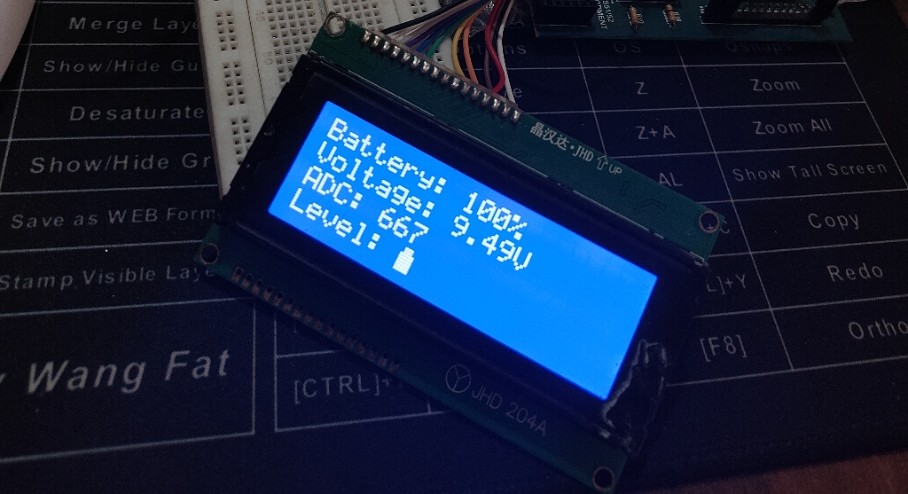
  • Precision: Get actual voltage and a calculated percentage, giving you a clear picture of your battery's health.
  • Intuitive Visuals: A custom-designed battery icon on the LCD changes its fill level to visually represent the charge.
  • Early Warning System: The battery icon blinks frantically when power drops below 10%, ensuring you never miss a critical low battery alert.
  • Educational Value: Learn about Analog-to-Digital Conversion (ADC), voltage dividers, LCD custom characters, and non-blocking timing with millis().

Components You'll Need:

  • Arduino Board: Any compatible board (e.g., Uno, Nano, Mega) or even AT89S51 development board like the one I'm using
  • 20x4 LCD Display: A standard 20 character, 4-line Liquid Crystal Display. (Our code assumes direct wiring as shown in the pin definitions, but you can adapt for I2C LCDs with minor library changes).
  • 9V Battery: Or any DC battery you wish to monitor (adjust resistor values and EXPECTED_V_OUT accordingly).
  • Resistors:
    • 1 x 21 kΩ (R1)
    • 1 x 5 kΩ (R2)
  • Breadboard: For prototyping.
  • Jumper Wires: For connections.
  • Multimeter (Optional but Recommended): For verifying voltage divider output and your Arduino's ADC reference voltage.
  • Download the arduino INO file here: Github Link
  • Youtube Short: Link (optional)

The Circuit: Wiring Up Your Battery Monitor

The heart of voltage measurement is a simple voltage divider. Since Arduino's analog input (and its default ADC reference) usually operates around 5V, directly connecting a 9V battery would damage it. The voltage divider steps down the 9V to a safe, measurable level.

Here's how to connect everything:

  1. LCD Connections (to Arduino Digital Pins):

    • RS (Register Select) to Digital Pin 0
    • EN (Enable) to Digital Pin 1
    • D4 to Digital Pin 2
    • D5 to Digital Pin 3
    • D6 to Digital Pin 4
    • D7 to Digital Pin 5
    • RW (Read/Write) to GND
    • VSS (Ground) to Arduino GND
    • VDD (Power) to Arduino 5V
    • V0 (Contrast) to a 10kΩ potentiometer (outer pins to 5V & GND, middle pin to V0) or directly to GND for full contrast.
    • Backlight A (Anode) to 5V via a 220Ω resistor (optional)
    • Backlight K (Cathode) to GND
  2. Battery Voltage Divider (to Arduino Analog Pin A3):

    • Connect the positive terminal of your 9V battery to one end of the 21 kΩ resistor (R1).
    • Connect the other end of the 21 kΩ resistor to one end of the 5 kΩ resistor (R2).
    • Connect the other end of the 5 kΩ resistor to the GND of your Arduino and the negative terminal of your 9V battery (ensure common ground!).
    • Connect the junction point between the 21 kΩ and 5 kΩ resistors (where they meet) to Arduino Analog Pin A3 (BATTERY_LEVEL_IN).

    Critical Note on REFERENCE_VOLTAGE: In our specific setup, the Analog Reference Voltage (AREF) of the ATmega16 (which your previous code indicated you're using, possibly on a custom board) is set to 2.8V. This is crucial for accurate readings. If your Arduino board uses a different AREF (e.g., default 5V for Arduino Uno), you must adjust the #define REFERENCE_VOLTAGE line in the code accordingly. For example, if using an Uno's default 5V reference, change it to 5.0.

How It Works: Diving into the Code

  1. Constants & Libraries:

    • LiquidCrystal.h: Standard library for interfacing with LCDs.
    • PIN_LCD_RS etc.: Defines the Arduino pins connected to your LCD.
    • BATTERY_LEVEL_IN A3: Specifies which analog pin the voltage divider output is connected to.
    • ANALOGIC_MAX_READING 1023.0: For a 10-bit ADC, the analogRead() function returns values from 0 to 1023. Using 1023.0 ensures accurate floating-point division.
    • REFERENCE_VOLTAGE 2.8: Crucial! This must match the actual analog reference voltage being used by your Arduino's ADC. If you're using a standard Arduino Uno, this is typically 5.0V. If you have an external reference or specific ATmega16 setup, measure it and set it here.
    • R1 and R2: Your voltage divider resistor values.
    • EXPECTED_V_OUT 9.45: This is the voltage you consider to be 100% full for your battery. Adjust this based on your battery's specifications. For a nominal 9V battery, 9.45V might be its peak charge.
    • lastBlinkTime, blinkInterval, blinkState: Variables for the non-blocking blinking feature.
  2. Custom Characters (byte batteryEmpty[8] etc.):

    • These byte arrays define the pixel patterns for each of your battery fill levels. Each Bxxxx represents a 5-pixel row. B1 means the pixel is on, B0 means it's off.
    • In setup(), lcd.createChar(location, char_array); loads these patterns into the LCD's special Character Generator RAM (CGRAM). You can store up to 8 custom characters (locations 0-7).
  3. Voltage Calculation (loop()):

    • value = analogRead(BATTERY_LEVEL_IN);: Reads the analog voltage from your voltage divider.
    • vOut = (value * REFERENCE_VOLTAGE) / ANALOGIC_MAX_READING;: Converts the raw ADC reading (value) into the actual voltage measured at the A3 pin (vOut).
    • vIn = vOut * ((R1 + R2) / R2);: Reverses the voltage divider formula to calculate the actual battery voltage (vIn). This is the magic that converts the low voltage at A3 back to your battery's full voltage.
    • percent = (int)(vIn * 100 / EXPECTED_V_OUT);: Calculates the battery percentage relative to your EXPECTED_V_OUT.
  4. Display Logic & Blinking:

    • lcd.clear();: Clears the screen each time for a fresh display.
    • lcd.setCursor() and lcd.print(): Standard LCD functions to display text and numerical values.
    • batteryChar selection: An if-else if ladder checks the percent and selects the appropriate custom character ID (0-4).
    • Blinking (if (percent < 10) block):
      • It uses millis() to track time, allowing the Arduino to continue doing other tasks without freezing.
      • Every blinkInterval (500ms), blinkState is toggled.
      • If blinkState is true, the batteryChar (which will be the batteryEmpty symbol when less than 10%) is displayed using lcd.write(batteryChar);.
      • If blinkState is false, a blank space is printed, making the character disappear. This creates the blinking effect.
    • delay(100);: A short delay ensures the LCD updates are visible and the blinking is smooth.

Getting Started:

  1. Assemble the Circuit: Follow the wiring instructions above carefully. Double-check all connections, especially the voltage divider and LCD pins.
  2. Copy the Code: Paste the entire Arduino sketch into your Arduino IDE.
  3. Adjust Constants:
    • Crucially, verify and set REFERENCE_VOLTAGE to the actual analog reference voltage of your Arduino. Use a multimeter on your Arduino's AREF pin or 5V pin (if default reference).
    • Adjust R1, R2, and EXPECTED_V_OUT if you are using different resistors or monitoring a battery with a different full voltage.
  4. Upload: Select your Arduino board and port, then upload the code.
  5. Observe! You should now see your battery's status displayed clearly on the LCD.

This project provides a robust and visually appealing way to keep an eye on your battery's health. Give it a try, and say goodbye to unexpected power outages in your projects!

Download the arduino INO file here: Github Link

Exposing Google Maps 5-Star Rating Scam: How Scammers Exploit Trust

Scammer_Pic

Beware of the Latest Google Maps 5-Star Rating Scam

In an era where online scams are becoming increasingly sophisticated, a new scheme has emerged, targeting unsuspecting individuals through Google Maps reviews. This scam not only preys on people's trust but also exploits the allure of easy money. Here’s how it works and how you can protect yourself.


How the Scam Operates

  1. Initial Contact via WhatsApp: The scam begins with a message on WhatsApp from someone posing as a representative of a legitimate company. They introduce themselves with what appears to be a genuine identity, complete with a business name and professional tone. 

    scammer_on_whatsapp

  2. The Tempting Offer: They claim to promote their business and offer you a quick and easy way to earn money. All you need to do is leave a 5-star rating for a specific location on Google Maps. In exchange, they promise to pay you ₹200 instantly.

    sammer_payment

  3. Building Trust: Once you agree, they send you a list of places to review. They guide you to search for these locations on Google Maps and leave glowing reviews. True to their word, they transfer ₹200 to your account, solidifying your trust in them.

  4. Transition to Telegram: After gaining your trust, they introduce you to their "manager" and provide a fake employee ID to make the operation seem credible. You’re then asked to contact this manager via a Telegram ID.

  5. The Telegram Channel and Application: The manager adds you to a Telegram channel where other participants share their successes, creating a false sense of legitimacy. You’re told to complete a set of 20 tasks, which now involve downloading an app and making small investments to "earn" more money.

    fake_application

  6. The Big Trap: The tasks escalate, requiring increasingly larger investments. By the time victims realize something is amiss, they may have already poured substantial amounts of money into the scam. Eventually, the scammers disappear, leaving victims with significant financial losses.


Why This Scam Works

  • Trust-Building: By initially delivering on their promise of paying for reviews, scammers establish credibility.

  • Social Proof: Telegram channels filled with fake participants and success stories make the scam appear legitimate.

  • Gradual Escalation: The scam starts with small, harmless actions (writing reviews) and escalates to significant investments.

    scammer_exposed


How to Protect Yourself

  1. Be Skeptical of Easy Money: Offers that sound too good to be true usually are. Legitimate businesses don’t pay people to leave fake reviews.

  2. Verify Identities: Always verify the identity of people contacting you, especially when they claim to represent a business. Look up the company independently and confirm their association with the individual.

  3. Avoid Sharing Personal Information: Refrain from sharing sensitive details or installing unknown apps on your device.

  4. Report Suspicious Activity: If you suspect a scam, report it to the relevant authorities and platforms (e.g., Google, Telegram, or WhatsApp).

  5. Educate Others: Spread awareness about this scam to prevent others from falling victim.


Conclusion

The Google Maps 5-star rating scam is a stark reminder of how scammers adapt to exploit digital platforms. While the promise of easy money can be tempting, staying vigilant and cautious is crucial. Always remember: if something seems too good to be true, it probably is. Protect yourself and help others by sharing this information widely.

LCD library for 20x4 display in 4 Bit Mode

20x4 LCD


Below is the code for running 20x4 display LCD in 4 bit mode. You can copy the code and save it as a header file (.h) and then include the same in your main program.

Please don't forget to change the PINs according to your sketch.

Please leave a comment for any queries or feedback

/*

 * lcd_lib.h

 * Created By: Ramandeep Singh

 * Created date: 11-Sep-2023

 */

#include <inttypes.h>

//Defines your PINS accordingly to your configuration

#define LCD_CONTROL_DDR DDRC

#define LCD_CONTROL_PORT PORTC

#define LCD_RS_PIN 6

#define LCD_RW_PIN 5

#define LCD_ENABLE_PIN 4

//

#define LCD_DATA1_DDR DDRC

#define LCD_DATA1_PORT PORTC

#define LCD_DATA1_PIN PINC

#define LCD_D4 0

#define LCD_D5 1

#define LCD_D6 2

#define LCD_D7 3


 void lcd_cmd(uint8_t command)  //used to write instruction to LCD

 {

PORTC = command>>4;

PORTC &= (~(1<<LCD_RS_PIN)); //RS=0

PORTC &= (~(1<<LCD_RW_PIN));  //RW=0

PORTC |= (1<<LCD_ENABLE_PIN); //EN=1

_delay_ms(10); //10ms

PORTC &= (~(1<<LCD_ENABLE_PIN)); //EN=0


PORTC = (command & 0x0F);

PORTC &= (~(1<<LCD_RS_PIN)); //RS=0

PORTC &= (~(1<<LCD_RW_PIN));  //RW=0

PORTC |= (1<<LCD_ENABLE_PIN); //EN=1

_delay_ms(10); //10ms

PORTC &= (~(1<<LCD_ENABLE_PIN)); //EN=0


}


  void lcd_data(uint8_t data)  //for writing data to LCD

  {

  PORTC = data>>4 ;

  PORTC |=(1<<LCD_RS_PIN);  //RS=1

  PORTC &=(~(1<<LCD_RW_PIN));  //RW=0

  PORTC |=(1<<LCD_ENABLE_PIN);  //EN=1

  _delay_ms(10);  //10ms

  PORTC &=(~(1<<LCD_ENABLE_PIN)); //EN=0


  PORTC = (data & 0x0F);

  PORTC |=(1<<LCD_RS_PIN);  //RS=1

  PORTC &=(~(1<<LCD_RW_PIN));  //RW=0

  PORTC |=(1<<LCD_ENABLE_PIN);  //EN=1

  _delay_ms(10);  //10ms

  PORTC &=(~(1<<LCD_ENABLE_PIN)); //EN=0


  }


  void LCD_print(char *str) /* Send string to LCD function */

  {

  int i;

  for(i=0;str[i]!=0;i++) /* Send each char of string till the NULL */

  {

  lcd_data(str[i]);

  }

  }


void LCD_print_xy(uint8_t x, uint8_t y, char *str) {

uint8_t position = 0x80; // Starting address of the first line

if (y == 1) {

position = 0xC0; // Starting address of the second line

} else if (y == 2) {

position = 0x94; // Starting address of the third line

} else if (y == 3) {

position = 0xD4; // Starting address of the fourth line

}

position += x; // Add the x-coordinate to the position

lcd_cmd(position);  // Send the command to set the cursor position

LCD_print(str);

}


void LCD_goto_XY(uint8_t x, uint8_t y) {

// Define the starting addresses for each line of a 20x4 LCD

static const uint8_t line_offsets[] = {0x00, 0x40, 0x14, 0x54};

// Ensure x and y are within bounds

if (x >= 20 || y >= 4) {

return;  // Invalid coordinates

}

// Calculate the DDRAM address based on x and y

uint8_t position = line_offsets[y] + x;

// Set the cursor to the desired position

lcd_cmd(0x80 | position);

}

 void LCD_init()

 {

lcd_cmd(0x02);   //Set cursor to home position

lcd_cmd(0x28);  //4bit mode

lcd_cmd(0x06); //Entry Mode

lcd_cmd(0x0c); //display ON cursor OFF

lcd_cmd(0x01);   //clear the display

lcd_cmd(0x80);   //set cursor at line1

 }


void  LCD_clear()

{

lcd_cmd(0x01);

lcd_cmd (0x80);

}


//how to use:

//LCD_init();

//LCD_Print("My String");

//LCD_print_XY(0,0,"My String");

//LCD_goto_XY(16,3); LCD_print("My String");

//LCD_Clear();

Delete Your Uber Account Instantly

Delete Your Uber Account Instantly

Hi Friends,
As we all know, Uber is famous for taxi ride services mainly in India and outside. Now, not only Uber, there are many more ride services which are being offered by other competitors brands like OLA, Rapido, Shuttl, MyCar etc. much less price than the uber for the same route/service. 

Now if you want to switch from Uber to other ride platforms and wish to withdraw or disable uber account then you can simply do the same by following below steps.


Note: Any Outatanding Balance Must Be Cleared/To be Paid to remove Uber Account Permanently.

As you can see in below snaphsot that uber doesn't allow to delete the account if any outstanding amount is billed.

Snapshot:


Step to delete Uber account:


1. Navigate to below URL:


https://accounts.uber.com/privacy/deleteyouraccount


2. Tap on Sign in using any of the below options. Its good if you remember your password associated with Uber mobile.

3. Click Next and Confirm to proceed further.
4. Provide them a valid reason for leaving Uber.
5. Confirm your account deletion.


Hope this article help you, share like and comment below for any query.


How To Trace Mobile Number With Name


trace cell with name
SomeOne is disturbing you again and again with unknown number and you want to know about who's behind the number. Then this tutorial will help you a little bit, I'm here giving of explanation of three easy guides that lets help you to trace an unknown cell phone's location, network provider and NAME also (yes with name ☺).

Unlock any BSNL 3G data card

Unlock Card

Many of us have bought BSNL 3g data card but some time we want it to run/connect to any network other than BSNL. But its the major problem of BSNL data card. It could only connect to BSNL network. It doesn't support any other SIM card but only BSNL.