Archive: May 2024

How to Install ClickOnce Application Silently

How to Install ClickOnce Application Silently
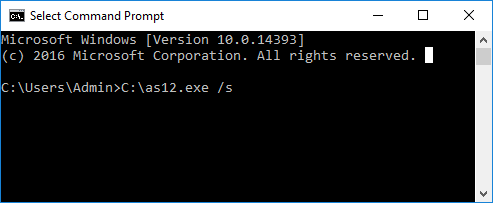
command windows

ClickOnce is a powerful deployment technology that allows users to install and run applications with minimal user interaction. However, there are scenarios where you may need to install a ClickOnce application silently mainly when deploying in an organization with thousand's of machines using SCCM or other tools, without user prompts or confirmations. Fortunately, this can be achieved using a tool called ClickOnceSilentInstall.exe. In this blog post, we'll walk you through the steps to silently install a ClickOnce application using this tool.

What is ClickOnce?

ClickOnce is a Microsoft technology that simplifies the deployment of Windows-based applications. It allows applications to be installed and run with a single click from a web page, network share, or other deployment methods. One of its key features is the automatic update mechanism, which ensures that the application is always up to date.

Why Silent Installation?

Silent installation is beneficial in various scenarios, such as:

  • Enterprise Deployments: IT administrators can deploy applications across multiple machines without interrupting users.
  • Automated Setup Scripts: Silent installations can be part of automated setup scripts for setting up environments quickly.
  • User Experience: Avoiding multiple prompts and dialogs can lead to a smoother user experience.

Prerequisites

Before proceeding, ensure you have the following:

  1. The ClickOnce application deployment URL or the .application file path.
  2. ClickOnceSilentInstall.exe – This is the utility that enables silent installation. Link: Download ClickOnceSilentInstaller

Steps to Install ClickOnce Application Silently

Follow these steps to install a ClickOnce application silently using ClickOnceSilentInstall.exe:

Step 1: Download ClickOnceSilentInstall.exe

First, download ClickOnceSilentInstall.exe from a trusted source. Ensure the version you download is compatible with your environment and the ClickOnce application you intend to install.

Step 2: Prepare the ClickOnce Application URL

You need the deployment URL of the ClickOnce application or the path to the .application file. This URL is typically provided by the application vendor or can be found on the application’s download page.

Step 3: Execute the Silent Installation

Open a Command Prompt window with administrative privileges and navigate to the directory where ClickOnceSilentInstall.exe is located. Run the following command:

ClickOnceSilentInstall.exe "<ClickOnce_Application_URL>"

Replace <ClickOnce_Application_URL> with the actual URL of the ClickOnce application. For example:

ClickOnceSilentInstall.exe "http://example.com/MyApp.application"

Step 4: Verify Installation

After running the command, the ClickOnce application should install silently in the background. To verify the installation, you can check the Start menu or the installation directory specified by the ClickOnce deployment or search in the add or remove programs under control panel.

Advanced Options

ClickOnceSilentInstall.exe may support additional parameters for more advanced installation scenarios. Refer to the documentation provided with the tool for details on options such as logging, custom installation paths, and more. You can also use below command to get other install options:

clickoncesilentinstaller.exe /?

Conclusion

Silent installation of ClickOnce applications using ClickOnceSilentInstall.exe is a straightforward process that can greatly enhance deployment efficiency in various environments. Whether you're an IT administrator deploying applications across an organization or a developer setting up automated installation scripts, this method can save time and reduce user interruptions.

For any issues or further customization, consult the documentation of ClickOnceSilentInstall.exe or seek assistance from the application's support team. Happy silent installing!

By following these steps, you can streamline the deployment process and ensure a smooth, user-friendly experience. If you have any questions or run into issues, feel free to leave a comment below.

Explore Your Destination Before You Go

Are you planning a trip to a new destination? Want to get a sneak peek of the streets and landmarks before you even set foot there? Thanks to Google Street View, you can virtually explore your destination from the comfort of your own home. In this guide, we'll show you how to use Google Street View to quickly view places on Google Maps and make the most out of your trip planning experience.

What is Google Street View?

Google Street View is a feature of Google Maps that provides panoramic, street-level imagery of various locations around the world. With Street View, you can virtually walk down streets, explore neighborhoods, and even view the exteriors of buildings, giving you a sense of what it's like to be there in person.

Why Use Google Street View for Trip Planning?

Using Google Street View can be incredibly helpful when planning a trip for several reasons:

  1. Get Familiar with the Area: Street View allows you to familiarize yourself with the layout of the streets and neighborhoods in your destination. This can help you navigate more confidently once you arrive.

  2. Explore Points of Interest: You can use Street View to scout out points of interest such as restaurants, attractions, and landmarks. This can help you prioritize what you want to see and do during your trip.

  3. Assess Accessibility: Street View can also be useful for assessing the accessibility of your destination, such as identifying wheelchair ramps or stairs.

  4. Visualize Accommodations: If you've booked accommodation, you can use Street View to see what the surrounding area looks like and get a sense of the neighborhood vibe.

How to Use Google Street View for Trip Planning

  1. Search for Your Destination: Start by going to Google Maps (https://www.google.com/maps) and entering the name or address of your destination in the search bar. Or you can open google maps on your phone and search the destination accordingly.

  2. Pegman
    Enter Street View: Once you've found your destination on the map, look for the yellow "Pegman" icon in the bottom right corner of the screen. Click and drag the Pegman onto the map to enter Street View mode.

  3. Explore Your Destination: In Street View, you can navigate around by clicking and dragging the screen or using the arrow keys on your keyboard. Explore different streets and landmarks to get a feel for the area.

    Street view on google using pegman

  4. Zoom In and Out: Use the zoom controls or your mouse scroll wheel to zoom in for a closer look at buildings and attractions. This can help you see details more clearly.

  5. Switch Between Views: You can switch between different Street View images by clicking on the arrows that appear on the screen. This allows you to explore different vantage points of the same location.

  6. Exit Street View: To exit Street View and return to the map, simply click on the "X" icon in the top left corner of the screen.

Tips for Using Google Street View Effectively

  • Use Fullscreen Mode: For a more immersive experience, click on the fullscreen icon in the bottom right corner of the Street View window.

  • Look for Blue Lines on the Map: Blue lines on the map indicate streets where Street View is available. Look for these lines when planning your route.

  • Explore Nearby Areas: Don't just focus on your destination; explore nearby areas and attractions as well to make the most of your trip.

Conclusion

Google Street View is a powerful tool for trip planning that allows you to explore your destination in detail before you even leave home. By following the tips in this guide, you can quickly view places on Google Maps using Street View and make informed decisions about your upcoming trip. So why wait? Start exploring your next destination today and get ready for an unforgettable adventure!

Send WhatsApp Message Without Saving Number(100% Working)

This post will be helpful for those who daily use WhatsApp to send message to various people within a day. So far the option was to save the number and then search on whatsapp and then send the message. 
Using below steps, you won't need to save the number and you can send the messages instantly.

Here we go:
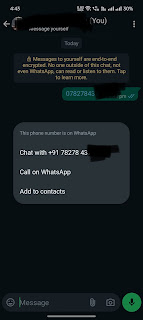
1. Copy the phone number that you need to send the message without saving it.
2. Open your Whatsapp, now you can open any chat but I recommend open your own chat (save your number if not)
3. Paste that number you already copied
4. The number will turn to blue i.e. it will be hyperlink.
5. Tap on the number and there you will get option "Chat with +91xxxx".
6. Click that option and new chat windows will open.
7. Congratulations, now you can send WhatsApp messages without saving the number.

{LATEST} Use WhatsApp Number On Multiple Devices

{LATEST} Use WhatsApp Number On Multiple Devices
Earlier WhatsApp being used in one device at a time only and if you have to use same number on different phone then it was not possible without deregisterimg on one device.
Now after the recent WhatsApp update, you can use the same number on multiple devices simultaneously. 
Yes, you heard me right. All the devices can send and receive the messages simultaneously and in real time.

Belo are the steps to do that:
1. Make sure you have one active device with your primary number running up WhatsApp.
2. On secondary device, install WhatsApp from playstore (or apple store). For desktop web.whatsapp.com is already being used to send/receive message.
3. On secondary device, open WhatsApp that you recently installed.
4. Do not enter the number to verify, instead click on 3 vertical dots on top right on the WhatsApp screen.
5. Click on Link As Companion option
6. A QR code will be displayed, now open primary device and click on 3 vertical dots and choose Linked Devices option.
7. Now scan the QR from secondary device.
8. Now, both the devices are ready to use simultaneously.

Please comment and let me know if you have any questions or query.